


Front suspension guide for the 1st-generation Honda Fit (2003–2008 in Brazil): the assembly's parts in Honda manual illustrations, with Mercado Livre prices — and, for anyone doing the work, official torques and channel videos tucked into each section.
1 · The strut kit, piece by piece
The assembly that wears out most (and gets bought most often): the strut mount and bump stop kit. In the manual's exploded view, each list number marks the corresponding part:
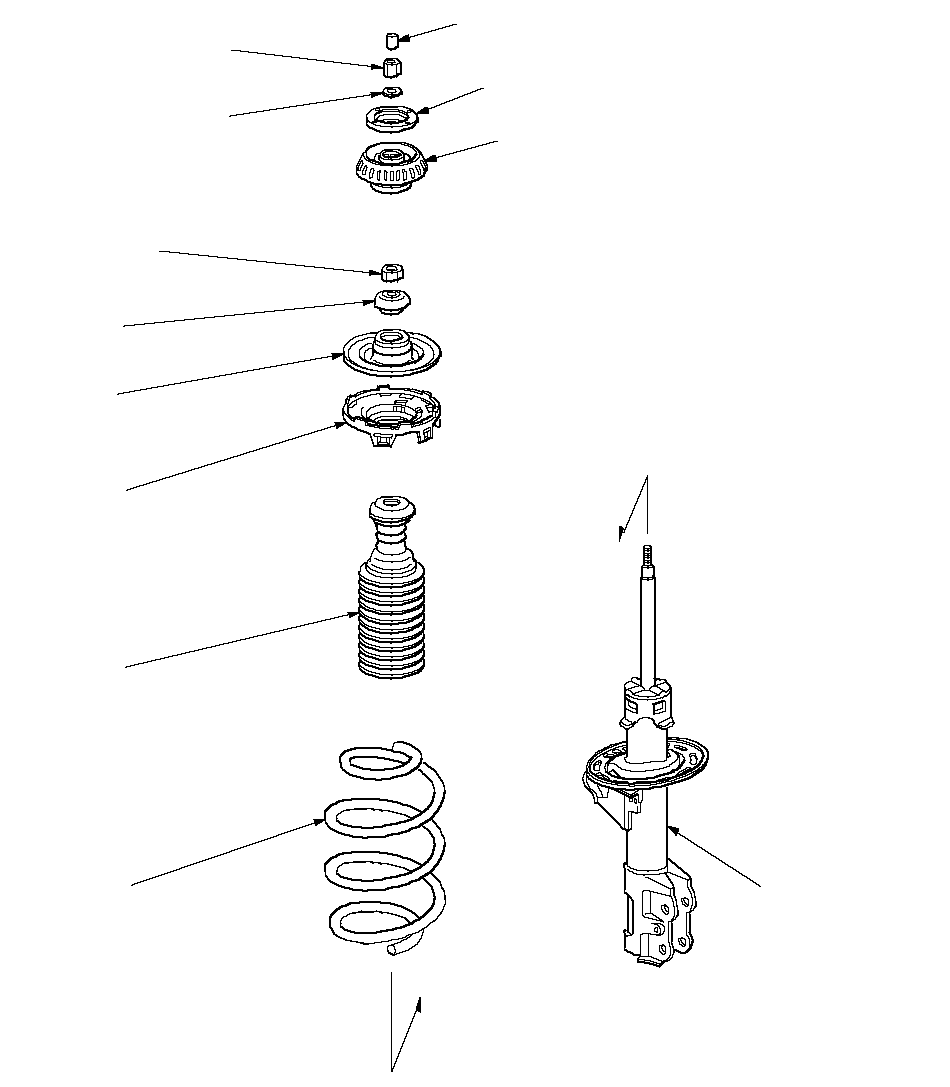 1.1 1.2 1.3 1.4 1.5 1.6 1.7 1.8
Illustration: Honda Jazz/Fit 2002–2005 service manual · for information
- 1.1Strut tower cap, nuts (3×) and washer · stay on the car
- 1.2Upper mounting plate · metal strut mounting base
- 1.3Upper strut mount · absorbs impacts transmitted to the body
- 1.4Strut mount bearing · clicking when steering at a standstill = this part
- 1.5Strut rod nut and spring seat · the seat is also sold separately
- 1.6Bump stop + dust boot · a hard thump over potholes = this part has crumbled
- 1.7Coil spring · fatigues and loses height over time
- 1.8Strut · leaking oil = time to replace it
- ★Complete strut mount and bump stop kit · mount + bearing + bump stop + boot in one package
Torques, manual checklist and replacement videos
Scroll horizontally to see all table columns.
| Fastener | Thread | Torque (Honda manual) |
|---|---|---|
| Strut tower nuts (mount → body) | — | 34 N·m (3,5 kgf·m) |
| Central strut rod nut | 12×1,25 | 44 N·m (4,5 kgf·m) |
| Strut → steering knuckle | 12×1,25 | 69 N·m (7,0 kgf·m) |
Manual checklist: mount free of cracks; bearing turns smoothly; upper plate not distorted; bump stop/boot intact; spring at specified free length; strut free of oil/gas leaks.
The whole corner: click a part
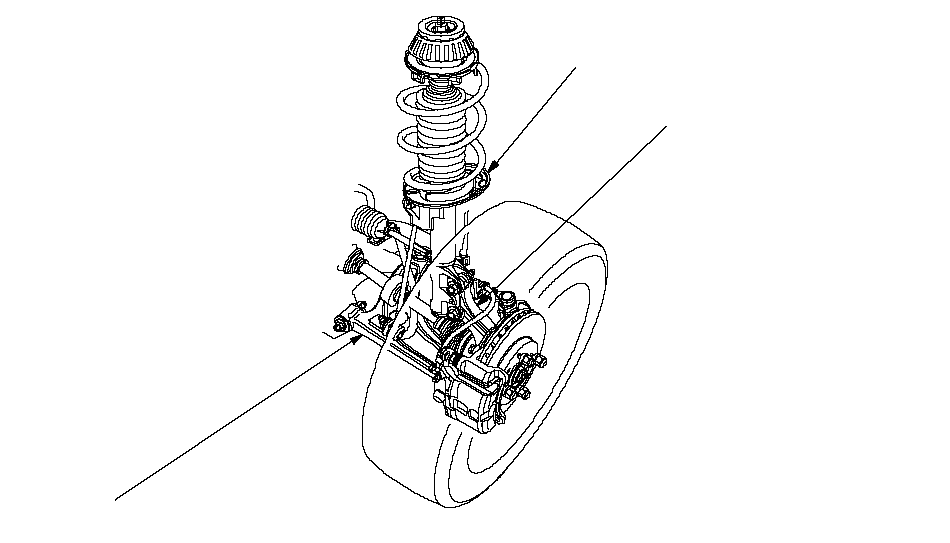
1: strut kit · 2: hub/bearing · 3: control arm/ball joint · the sway bar link (section 4) and tie rod end (section 5) are behind the assembly and are not shown in this view
2 · Hub, wheel bearing and steering knuckle
A hum that increases with speed and changes pitch when cornering = wheel bearing on its way out. It is item 2.1 in the exploded view — pressed into the steering knuckle:
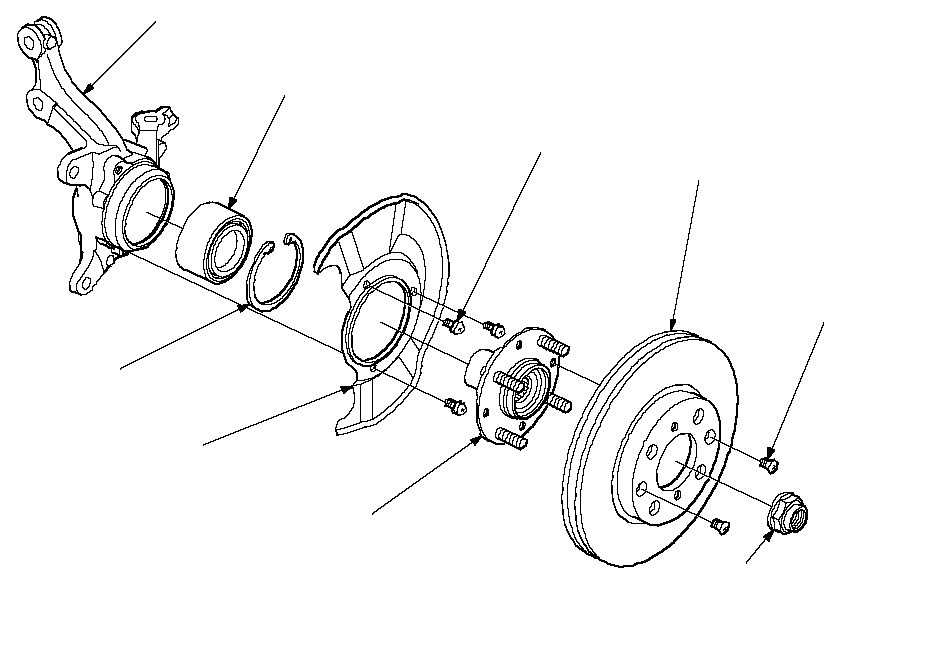 2.1 2.2 2.3
From left to right: steering knuckle · bearing (2.1) · circlip · backing plate · hub (2.2) · disc · axle nut (2.3)
- 2.1Wheel bearing · pressed into the steering knuckle
- 2.2Wheel hub
- 2.3Axle nut · single use: replace whenever removed (manual)
Torques and notes
Scroll horizontally to see all table columns.
| Fastener | Thread | Torque (Honda manual) |
|---|---|---|
| Axle nut (replace) | 22×1,5 | 181 N·m (18,5 kgf·m) |
| Caliper bracket → steering knuckle | 12×1,25 | 108 N·m (11,0 kgf·m) |
| Brake disc locating screw | 6×1,0 | 9,8 N·m (1,0 kgf·m) |
| Backing plate | 5 mm | 6 N·m (0,6 kgf·m) |
Replacing the bearing requires a press — the home-garage approach is to remove the steering knuckle at home and take just that part to a workshop with a press to replace the bearing.
3 · Lower control arm, bushings and ball joint
Worn bushings = clunks and imprecise steering; a loose ball joint = a failed vehicle inspection and a real risk. Always fit a new cotter pin to the ball joint castle nut.
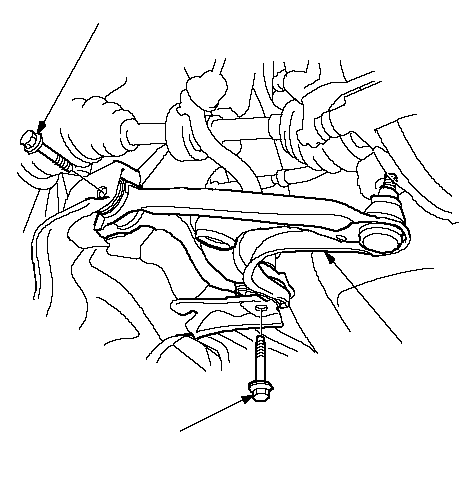 3.1 3.2 3.2
The control arm (3.1) viewed from underneath the car — the two bolts (3.2) pass through the front (69 N·m) and rear (93 N·m) bushings
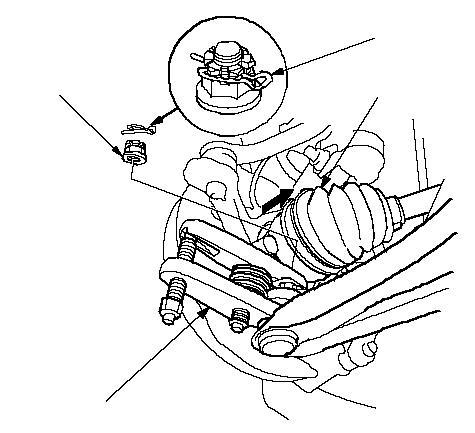 3.3
The ball joint (3.3) at the end of the control arm, with its castle nut (49–59 N·m + new cotter pin)
- 3.1Complete control arm · supplied with bushings and ball joint
- 3.2Control arm bushings · front and rear
- 3.3Ball joint
- 3.4Ball joint boot · when only the rubber has failed
Torques and videos
Scroll horizontally to see all table columns.
| Fastener | Thread | Torque (Honda manual) |
|---|---|---|
| Ball joint castle nut (+ new cotter pin) | 12×1,25 | 49–59 N·m (5,0–6,0 kgf·m) |
| Control arm → chassis (front bushing) | 12×1,25 | 69 N·m (7,0 kgf·m) |
| Control arm → chassis (rear bushing) | 14×1,5 | 93 N·m (9,5 kgf·m) |
4 · Sway bar link and sway bar
The leading source of noise: a loose sway bar link = knocking on uneven surfaces at low speed. An inexpensive part, quick to replace — a classic first repair for DIY mechanics.
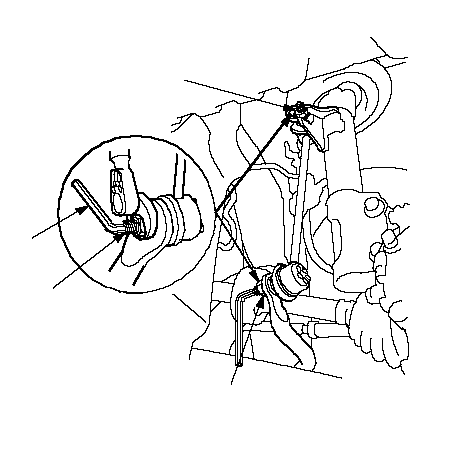 4.1
The sway bar link (4.1) connects the sway bar to the strut — manual torques are shown in the illustration
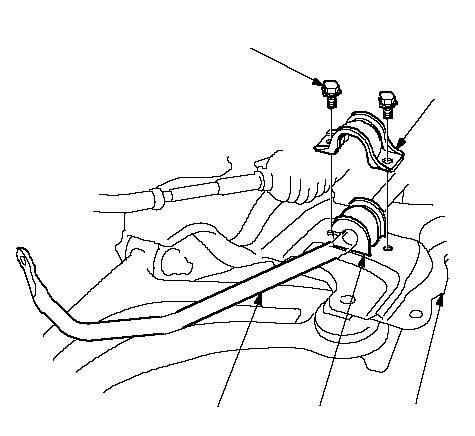 4.2
The bushing (4.2) wraps around the bar and is held by the clamp (bolts: 22 N·m)
- 4.1Sway bar link · left/right pair
- 4.2Sway bar bushings
Torques and videos
Scroll horizontally to see all table columns.
| Fastener | Thread | Torque (Honda manual) |
|---|---|---|
| Sway bar link → sway bar | 10×1,25 | 29 N·m (3,0 kgf·m) |
| Sway bar link → strut | 10×1,25 | 38 N·m (3,9 kgf·m) |
| Sway bar bushing clamps | 8×1,25 | 22 N·m (2,2 kgf·m) |
5 · Tie rod end
The tie rod end connects the steering rack to the steering knuckle — play causes loose steering and uneven tire wear, and it fails inspection just like a worn ball joint. In the manual diagram it is the joint at the end of the tie rod (5.1); the inspection calls for checking joint play, a loose locknut and boot condition.
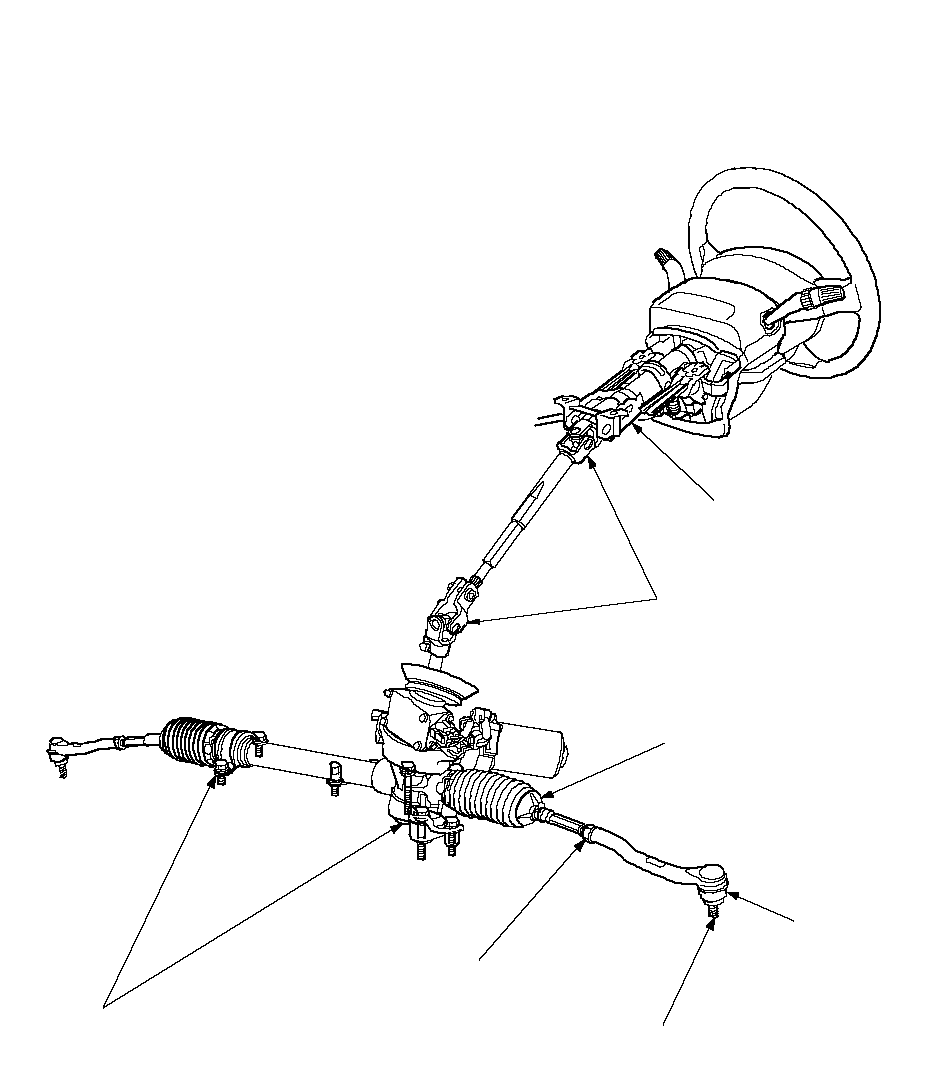 5.1
The complete steering linkage — the tie rod end (5.1) is the joint at the end of the rod, near the wheel
- 5.1Tie rod end · left/right pair · retighten the locknut and align afterward
Nearby parts that meet the assembly
The brakes (disc, pads, caliper) occupy the same corner and will get a dedicated page — front discs, rear discs and rear drums. The CV joint/tripod joint passes through the hub — the tripod joint boot has a dedicated channel video and an extra tip for the CVT transmission. One classic precaution when dismantling the suspension: do not leave the steering knuckle hanging from the brake hose.
Key tip: final tightening with the car on the ground
Rubber bushings (control arm, sway bar) should receive their final torque with the suspension at ride height — tightening with the wheel hanging leaves the bushing twisted and causes early failure. Paulo devoted a short video to this: ▶ Tightening with the car on the ground.
Complete front suspension torque table (Honda manual)
Scroll horizontally to see all table columns.
| Fastener | Thread | N·m | kgf·m |
|---|---|---|---|
| Axle nut (replace) | 22×1,5 | 181 | 18,5 |
| Caliper bracket → steering knuckle | 12×1,25 | 108 | 11,0 |
| Control arm → chassis (rear bushing) | 14×1,5 | 93 | 9,5 |
| Strut → steering knuckle · control arm (front bushing) | 12×1,25 | 69 | 7,0 |
| Ball joint castle nut (+ new cotter pin) | 12×1,25 | 49–59 | 5,0–6,0 |
| Central strut rod nut | 12×1,25 | 44 | 4,5 |
| Sway bar link → strut | 10×1,25 | 38 | 3,9 |
| Strut tower nuts | — | 34 | 3,5 |
| Sway bar link → sway bar | 10×1,25 | 29 | 3,0 |
| Sway bar bushing clamps | 8×1,25 | 22 | 2,2 |
| Brake disc locating screw | 6×1,0 | 9,8 | 1,0 |
| Backing plate | 5 mm | 6 | 0,6 |
Additional reference: the complete Fit table on Qual-O-Torque covers the entire car.
Tools for this job
- Click torque wrench — from the sway bar link (29 N·m) to the axle nut (181 N·m), every torque is specified.
- Jack + axle stands — never work underneath a car supported only by a jack.
- Spring compressor — essential, and dangerous if improvised.
- Ball joint separator — releases the ball joint and tie rod end without hammering the boot.
- Locking pliers and WD-40 — trusty companions.
Frequently asked questions
What is the Honda Fit axle nut torque?
181 N·m (18,5 kgf·m), thread 22×1,5 — and the manual requires replacing the nut every time it is removed (it is staked).
Knocking from the front of a Fit: what is usually responsible?
In order of likelihood (and cost): sway bar link, sway bar bushings, strut bump stop/mount, control arm bushings and finally the ball joint. The noise diagnosis video shows how to isolate each one.
Is alignment needed after suspension work?
It is recommended — especially after replacing a strut, spring, control arm or ball joint, which affect geometry. Replacing only the sway bar links/bushings does not alter alignment, but on a high-mileage car an alignment is never money wasted.
Do these torques apply to every model year of Fit?
They come from the Honda Jazz/Fit 2002–2005 manual — they cover the 1st generation (GD), sold in Brazil from 2003 to 2008, including the channel's 2004 Fit. For the 2nd generation onward, check the manual for your version.
Torques and checklists taken from the Honda Jazz/Fit 2002–2005 service manual (illustrations reproduced with attribution, for information). Video procedures: Paulo's Garage channel. This page does not replace the technical manual.